Delish Peppermint Patties Recipe
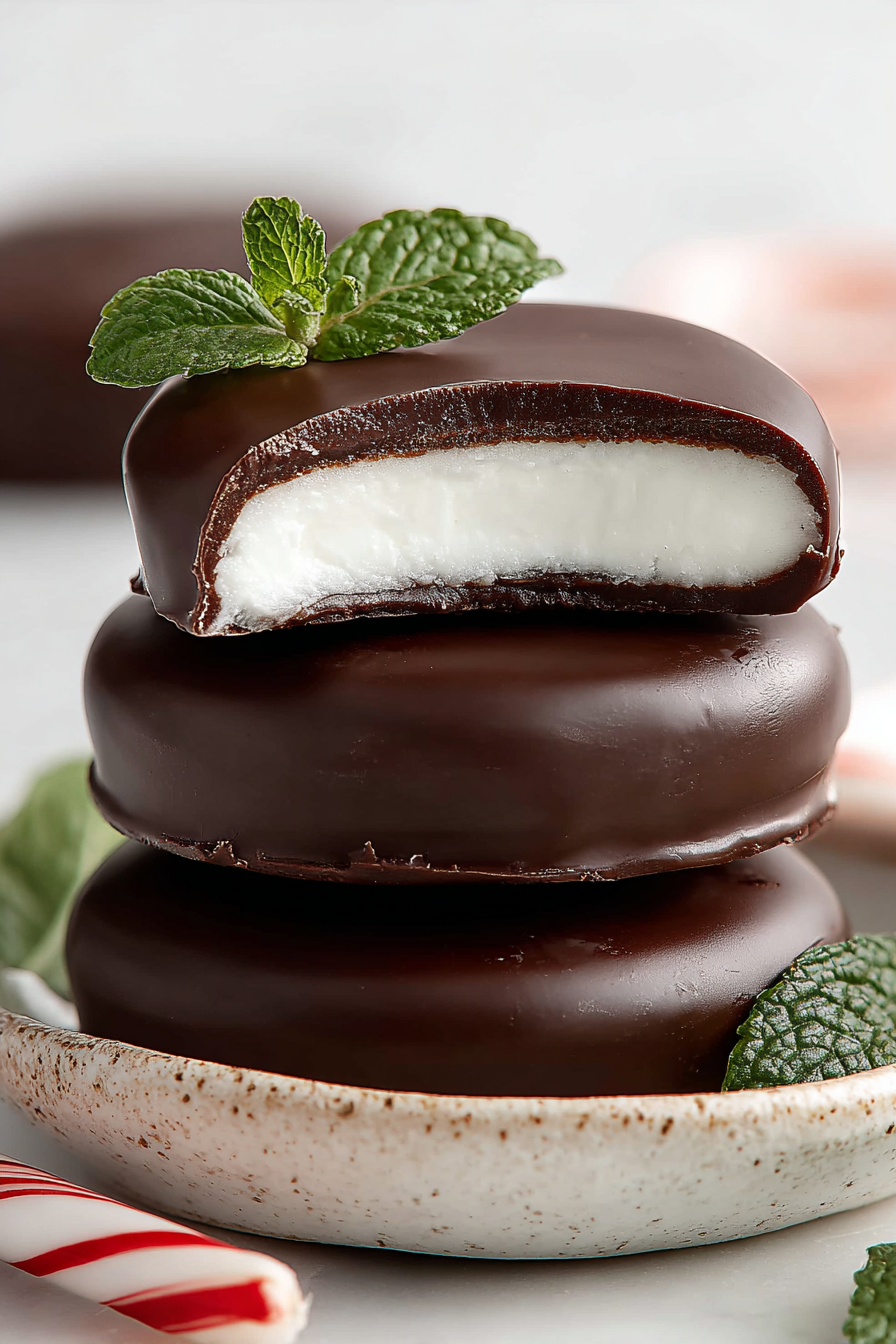
Peppermint patties are the little black dresses of candy: simple, classy, and shockingly forgiving when you’ve already got chocolate on your shirt. Picture a cool, creamy mint center wrapped in a snappy chocolate shell—store-bought vibes but with actual flavor and fewer suspicious ingredients. These are no-bake, mostly hands-off, and the kind of sweet that makes you feel “refreshed,” which is basically health food with better PR.
Last time I made a batch, my husband said he’d “just taste one” and then went on a full reconnaissance mission, finding the hidden container behind the bag of frozen peas because apparently I underestimate his survival skills. The kids helped by stealing the ones that looked “funny,” which is how I learned that skipping tempering turns the chocolate a little streaky. Did they still eat them? Yes. Did I claim it was an “artisanal marbled effect”? Also yes.
Why You’ll Love This Delish Peppermint Patties Recipe
– Five ingredients, zero oven, and minimal chance of burning something—unless you microwave like it’s a competitive sport.
– Cool mint center that’s not toothpaste-level aggressive. You’ll tingle, not cry.
– Dippable, giftable, stashable. Hide them in the freezer behind the frozen broccoli—no one will look there.
– Cheaper than the fancy store ones and twice as smugly satisfying.
– Customize the size: dainty discs for guests, frisbee patties for me when no one’s watching.
Time-Saving Hacks
– Use chocolate melting wafers. Are they “real” chocolate? Don’t ask me that while I’m wearing pajamas at 3 p.m.
– Roll the mint mixture between two sheets of parchment, freeze 10 minutes, then cookie-cutter your circles like a responsible adult who absolutely did not eyeball it first.
– No cutter? Slice a slab and call them “rustic squares.” Boom—chic.
– Microwave the chocolate at 50% power in short bursts. If it scorches, you now have “smoky notes.”
– Dip with a fork and tap off excess chocolate on the bowl’s edge like you’re on a cooking competition. Dramatic sighs optional.
MORE OF OUR FAVORITE…
Serving Ideas
– With coffee, because mint + caffeine = personality reboot.
– Crumbled over vanilla ice cream if you like your dessert to flex on other desserts.
– Serve after dinner with wine if the kids drove you nuts and “bedtime” took three separate negotiations and a treaty.
– Keep it simple: one patty, a quiet corner, and pretending you don’t hear “Mooooom?” for 60 beautiful seconds.
What to Serve It With
– Hot cocoa topped with too much whipped cream—accuracy matters.
– A tiny cheese board with salty nuts and fresh berries. Sweet + salty = friendship goals.
– Espresso martinis for “game night,” which is just us losing to an 8-year-old at Uno.
– Brownies or a chocolate tart: slice, plate, and crown each piece with a patty like you’re running a dessert speakeasy.
Tips & Mistakes
– If your mint filling is sticky, add more powdered sugar or chill it. If it’s crumbly, a teaspoon of milk or cream smooths things out.
– Go easy on the peppermint extract—there’s a fine line between festive and toothpaste commercial. Start small, taste, adjust.
– Keep your filling cold before dipping so it doesn’t swan-dive into the chocolate and ruin your mood.
– Tap off excess chocolate or you’ll get chocolate puddles. Delicious? Yes. Cute? Eh.
– Sprinkle a few with flaky salt before they set. It’s the difference between “homemade” and “I have a brand now.”
Storage Tips
Store it in the fridge… if there’s any left. Cold midnight leftovers? Sometimes better than fresh.
– Airtight container, layered with parchment so they don’t fuse into one mega patty (tempting, though).
– Fridge: up to 2 weeks. Freezer: 2–3 months. Thaw in the fridge so the chocolate doesn’t get weepy.
– Keep away from smelly foods unless you’re into onion-mint fusion. Please don’t be into onion-mint fusion.
Variations and Substitutions
– Dip in white or milk chocolate for chaos that absolutely works.
– Add a few drops of vanilla or almond extract to the filling for a softer mint vibe.
– Crush candy canes on top for holiday pizzazz and to hide any “creative” dipping.
– Color the centers pastel pink or green because you’re whimsical and also out of restraint.
– Dairy-free? Use dairy-free chocolate and a splash of coconut cream in the filling if needed.
– Sweeteners: powdered sugar is queen. If you swap in honey or maple, the centers get softer—call it “deconstructed” and move on.

Delish Peppermint Patties Recipe
Ingredients
Main Ingredients
- 3.5 cup confectioners' sugar Sifted for a smoother filling
- 0.5 cup sweetened condensed milk Adds sweetness and binds the filling
- 2 tablespoon unsalted butter, softened Room temperature for easy mixing
- 1.5 teaspoon peppermint extract Adjust to taste
- 0.5 teaspoon vanilla extract Optional, rounds out flavor
- 0.25 teaspoon fine salt Balances sweetness
- 2 cup semi-sweet chocolate chips Or chopped chocolate
- 1 tablespoon coconut oil or vegetable shortening Thins chocolate for smoother dipping
Instructions
Preparation Steps
- Line 2 baking sheets with parchment paper. In a mixing bowl, beat sweetened condensed milk and butter until smooth. Mix in peppermint extract, vanilla, and salt.
- Gradually add confectioners' sugar, mixing until a thick, smooth dough forms that no longer sticks to the bowl.
- Scoop 1 tablespoon portions, roll into balls, and flatten into 1.5 inch discs about 0.25 inch thick. Place on prepared sheets.
- Freeze the discs for 20 minutes until very firm for easier dipping.
- Melt chocolate chips with coconut oil in a microwave-safe bowl in 20 to 30 second bursts, stirring between each, until smooth and fluid.
- Using a fork, dip each chilled peppermint disc into the melted chocolate, let excess drip off, and return to the sheet. Repeat with remaining discs.
- Refrigerate 15 minutes until the chocolate sets. If desired, drizzle extra chocolate on top for a decorative finish.
- Store patties covered in the refrigerator for up to 2 weeks or freeze for up to 3 months.
Notes
Featured Comments
“This crowd-pleaser recipe was turned out amazing — the rich really stands out. Thanks!”
“New favorite here — will make again. crowd-pleaser was spot on.”
“This crowd-pleaser recipe was absolutely loved — the rich really stands out. Thanks!”
“Impressed! Clear steps and so flavorful results. Perfect for busy nights.”
“Made this last night and it was will make again. Loved how the rich came together.”
“Impressed! Clear steps and will make again results. Perfect for busy nights.”
“Impressed! Clear steps and turned out amazing results. Perfect for busy nights.”
“This rich recipe was absolutely loved — the creamy really stands out. Thanks!”
“Made this last night and it was family favorite. Loved how the rich came together.”
“New favorite here — will make again. sweet treat was spot on.”